|
Bell
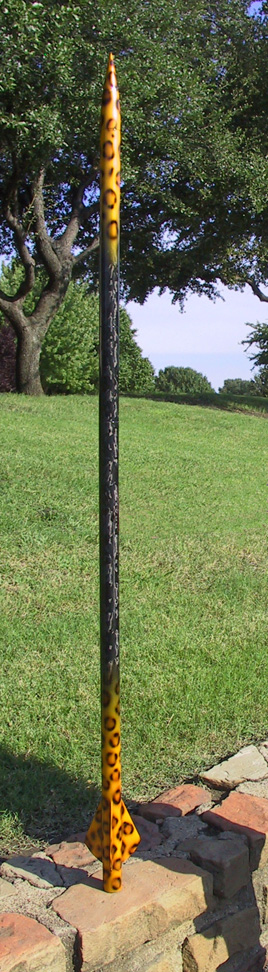
Rocketry is proud to present the JaguarXtreme!
Inspired by the Shadow Composites Raven,this
high performance vehicle has the following specs:
Features:
Filament wound Carbon fiber airframe
carbon fiber couplers
.084 carbon fiber plate fins Beveled to a ogive radius
Stainless steel hardware throughout Motor bulkhead eyebolt/2 coupler
ubolts/nosecone eyebolt, quicklinks, and swivels
Bell Rocketry special Slimline removable nosecone bulkhead
Performance Rocketry Fiberglass nosecone
bulkheads: .084 carbon fiber plate/ motor bulkhead/Avionics bay/main
chute bay/nosecone bay
Avionics bay low drag design with only two holes in Airframe: arm and
Vent for for Altacc 2C.
interior slide in electronics sleeve.
Rocketman R24D drogue and RC3 main chute dual deployment
1/8 inch tubular Kevlar shock cords
Top Flight Nomex drogue and main chute protectors
Able to
chamber the largest Tripoli Certified 38mm motor: using the 38/1080
motor casing
Finish
is an automotive Urethane paint and clear coating with a Bell Rocketry
design paint job commissioned to the airbrush artistry of Mike DuSold
of DuSold Designs
Final touch to add: Marshall Radio RT+ falcon telemetry transmitter
|
 |
|
| JaguarXtreme
Construction: |
8.29.03
|
|
| photos
and description to be added |
|
|
| Simulations-to
be added |
|
|
|
JaguarXtreme
Booster stage
Jaguar Extreme
Booster for making a two stage version: Final Design plans worked out
on 8/30/03 and construction started 8/30/03
|
|
|
| booster
construction log: |
|
|
| 8.30.03
actual start of construction |
|
|
| previously
accomplished: fins cut to shape from carbon plate |
|
|
|
started
at 10:30 am finished following at 6:10 pm
Beveled already cut Jaguar Booster fins with a dremel and by hand...
cut airframe tubes and squared booster, and interstage airframe
cut length of Coupler,
prepped the coupler tubing by slipping over a wooden dowel and then cut
mylar to size, cut peel ply to size,
sprayed mylar with release agent..then epoxied. Added two wraps of 5.7
oz carbon to build up and fit airframe with a tight fit.
applied mylar then applied heat tape and put in curing oven to cure.then
made the interstage coupler using two methods
cut mylar thick, and mylar thin and placed a section of airframe tubing
on a dowel, and then covered with packing tape, added thin mylar
wrap to one section
then sprayed the entire length of tubing with release agent.
then cut carbon to size, epoxied 5 wraps of carbon, on one side and
then used 6 inch wide carbon tape and epoxied to the other size
only over the section of tubing with only packing tape. covered with
mylar and heat tape-- then put in curing oven
The interstage
couplers are made of 5 wraps of carbon, and they came out
perfectly smooth. zero flaws.!
|
|
|
September
2, 2003:
released the
interstage couplers from the mandrel-- it took a lot of
brute force and the destruction of one section of the carbon mandrel
anyway, I finally got it out and now have enough tubing to make 3
interstage couplers--
My peel ply couplers with two wraps was just too much.... I could get it
to fit, but would take a lot of time sanding, so I made a new coupler
with one wrap( took coupler tube cut one wrap of carbon and epoxied added
peel ply, mylar , heat tape and cured.
tacked the fins on with jb weld
|
|
|
September
3, 2003:
*epoxied the fins with kevlar pulp and high temp epoxy
*made all the bulkheads
* made the booster bulkhead - drilled holes for eyebolt and motor
retention safety strap
* made the interstage coupler stop with cutouts for alignment of
avionics bay
*made the avionics bay bulkhead with stainless steel u bolt
*cut and sanded the booster coupler and fit
this took practically all day to do 8:30am to 9:00pm (minus lunch and
dinner breaks) |
|
|
| September
4, 2003:removed tape masking from high temp epoxied fins/airframe |
|
|
|
9:30- 5:40pm
September
5, 2003::sanded/smoothed out high temp epoxy fillets then epoxied
2 layers of carbon fiber on fin fillets and vacuum bagged.
sanded down
rough edges and post cured. ready for filling.
|
|
|
| |
|
|
| September
7, 2003: |
|
|
| used
superfil to fill fin area |
|
|
| September
8, 2003: |
|
|
| sanded
filled and started to prime 3 coats primer sanded/ one additional coat |
|
|
| September
9, 2003: |
|
|
|
Tuesday
by 13:53 CDT
*primed/sanded / Primed booster ---6 coats of primer now applied
*trimmed the interstage avionics bay
* cut rectangular hole in interstage bay for fitting timer.
* epoxied u bolt and bulkhead to avionics bay/ with aeropoxy and kevlar
pulp
* epoxied the booster coupler bulkhead cap together ( just an extra
little piece that fits into top of coupler)
*epoxied 3 bulkhead pieces together 1/4 carbon/ 1/4 carbon with
rhonacell core/1/4 carbon (this will be the bulhead between the 2nd
stage motor and
the avionics bay)
Stopped work at 10:15 pm CDT.....
last coat of primer applied and sanded... just some final sanding to go.
*finished drilling holes in airframe interstage unit- for Timer2
*vent in interstage
*epoxied motor bulkhead and coupler into booster section.
*drilled interstage coupler holes/ -vent , 3 interstage coupler holes
--
will use a button head machine screw to hold in place
Just a little sanding on the inside and out of the interstage coupler,
and finish sanding the booster section primed....
|
|
|
| September
10, 2003 |
|
|
|
Started work
at 6:30 am and finished at 9:30 am--
*sanded the inside of the interstage coupler to fit Jaguar
*beveled the interstage coupler edges
*final sanding of primered fin area
*removed tape and sanded down the edge where the primer meets the
unpainted airframe tube
*photos
took the
booster to the post office for weighing, then to paint shop to match the
Jaguar paint job
|
 |
 |
| |
9.10.03 |
11.16.03 |
| original
page added on 8.30.03/updated9.5.03 and 9/9/03 9/10/03 |
9.27.03
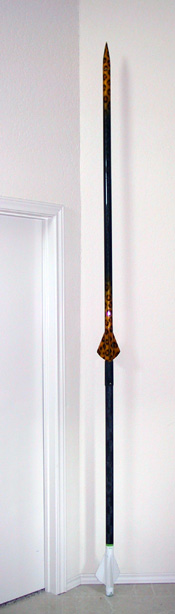
JaguarXtreme ready to fly |
New photo
finally posted
11.18.03
|
